A little About
I started Zak Software in 1982 doing database and programming work after leaving Eastman Kodak where I did roll coating, electronics development, testing and such. I went to Kodak in 1969 because I needed a “real” job – disco had started to kill the live band market. After a 15 year stretch there I decided it was time to start my own business, hence the beginning of Zak Software Inc.
When the net came along I got into it pretty quickly. Started by doing a few web sites and then decided I wanted one. I was working with Maria Friske and David Cowles – they formed our first “graphics department”. I wanted a site to put the various things Zaks and I did and I forget which one (if they every read this and it matters they can let me know) came up with this logo. Taking a look at it through the Wayback Machine at https://www.archive.org/web/web.php it shows what we’ve used it from 1996 to sometime in 1999.
I’ve thought about putting a site up with various stuff and found a copy of the logo. What the heck, it works and geez – it’s an antique.
So this stuff here is just anything I want to put somewhere. Some programming things that I found helpful, maybe they’ll help someone else or just make someone smile.
leon …
Musically Speaking
When I was 13 or 14 my sister got this idea to record her kids while they were young. With this in mind she bought a Wollensak 1/4″ tape recorder. This was a great idea – only she had no clue how to operate it. But you need to realize it was a different world then – you didn’t just pus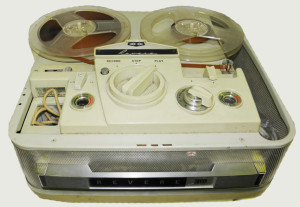 h the button.
Here’s a list of some of the groups and people that are included – this is as I remember, but this starts over 50 years ago so if you remember it better than me, or I forgot someone, or I spelled your name wrong, please let me know: CLICK HERE to read more and hear some music samples.
Bands
People
Michael Bonafede – My Brother
Dave Hucks
Jim Mayers
Butch (Vinnie?) Biocci
Richie Mayers
John Mayers
Dave Zascoda
Tom Porpiglia
My Ex-wife
Jimmy LaDolce
Doug Nicholes
John Conti
Dennis Marinelli
Paul Burgio
Dick Miller
Barry Case
JP Bracy
Krista Hartwig
Phil Kruger
George Conti
Bob Nardone
Mark Ketchum
John Perry
Chris Roth
Richie Simbari
Bob Miller
Bruce Diamond
Burce Hylan
Mike Dydtra
Beth Steele
Dana Gregory
Lex Byers
Pete Tantalo
Sarah Ryan
Darcy Demmin
Dan Hill
Jason Furiuso
Tom Porpiglia
And more …